
Tuesday, July 14, 2015
Monday, March 2, 2015
Create API and Publish using WSO2 API Manager
WSO2 API Manager is a complete solution for designing and publishing APIs, creating and managing a developer community, and for scalable routing API traffic. It leverages proven, production-ready integration, security, and governance components from the WSO2 Enterprise Service Bus, WSO2 Identity Server, and WSO2 Governance Registry. In addition, it leverages the WSO2 Business Activity Monitor for Big Data analytics, giving you instant insight into APIs behavior.
This article explains how to create and publish API in WSO2 API Manager. Here we are using http://www.webservicex.net/country.asmx web service and publish it as an API.
Prerequisite
WSO2 API Manager 1.5 or above
Steps
1. Download and unzip WSO2 API Manager
2. Start WSO2 API Manager.
3. Goto http://localhost:9763/publisher and login to publisher portal. (Default credentials user name : admin, password : admin)
4. Click Add and enter values as follows.

Once complete entering above value click Implement.
5. Enter values in next screen as follows and click manage. Enter correct service endpoint under Production Endpoint.

6. Enter values in next screen as follows and click Save & Publish

After completing above steps, you have an API published.
7. Go to https://localhost:9443/store/ and login to store portal.
8. Go to My Subscriptions and Click on the API created on the left hand list. Click Subscribe and Click Go to My Subscription from popup window.
Note. Copy Production and Sandbox URL under overview for later use.

8. Go to My Subscriptions and Click on the API created on the left hand list. Click Subscribe and Click Go to My Subscription from popup window.
Note. Copy Production and Sandbox URL under overview for later use.
9. Click Generate button under Keys-Production to generate access token.
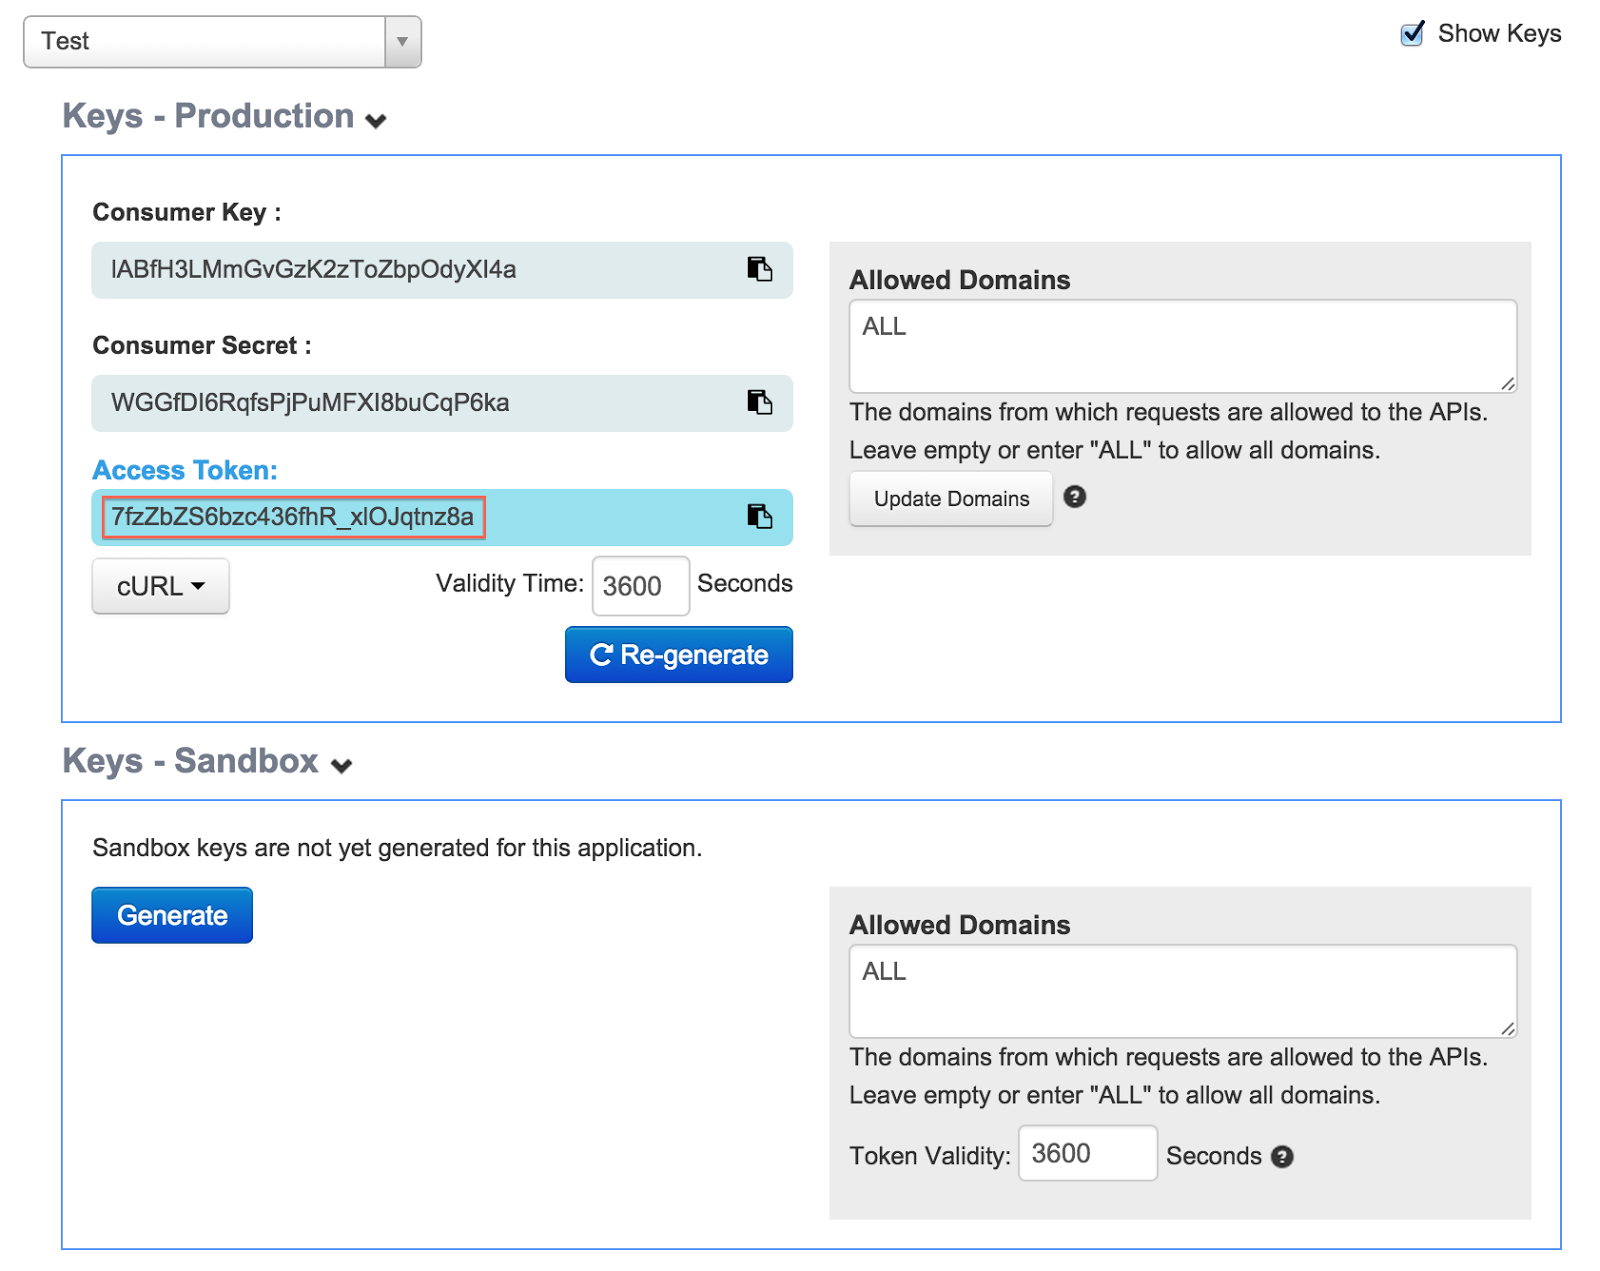
10. Go to Tools - >RESTClient and invoke API. Make sure to use correct entries for access token and URL. Following image illustrate required information.

Wednesday, January 28, 2015
WSO2Con EU 2015
WSO2Con brings together architects, directors, and CxOs who desire to gain insights into creating a connected business. The WSO2Con EU 2015 agenda will showcase and share technology developments, architecture guidelines and best practices to compete in a connected world using the WSO2 enterprise middleware platform.
.jpg)
Monday, January 26, 2015
Install XACML Engine in WSO2 API
This article explains how to install XACML engine in WSO2 API Manager.
Prerequisite
WSO2 API Manager 1.5 or above
Steps
1. Download and unzip WSO2 API Manager
2. Start WSO2 API Manager.
3. Install XACML feature in API Manager.
Goto http://localhost:9443/carbon and login to management console. Once inside the admin console, select the ‘configure’ tab from the tabs available on the left-hand side. Inside the ‘configure’ menu you would find the features icon as shown below.

Inside the features page, select the repository management tab and click on the ‘add repository’ icon

Add the following repository details in the ‘Add Repository’ page.

Prerequisite
WSO2 API Manager 1.5 or above
Steps
1. Download and unzip WSO2 API Manager
2. Start WSO2 API Manager.
3. Install XACML feature in API Manager.
Goto http://localhost:9443/carbon and login to management console. Once inside the admin console, select the ‘configure’ tab from the tabs available on the left-hand side. Inside the ‘configure’ menu you would find the features icon as shown below.
Inside the features page, select the repository management tab and click on the ‘add repository’ icon
Add the following repository details in the ‘Add Repository’ page.
Name – Turing
Once the repository is added, click on the ‘Available Features’ tab. Select the newly added repository and un-tick the ‘Group features by category option’ and click on ‘Find features’ button.
Select following two XACML features from the search list and install
Follow the installation flow and install the XACML features. After the installation is completed restart WSO2 API Manager.
Sunday, January 11, 2015
Remote debug in Tomcat
As developers we always need to debug the application, Please see below the simple steps to enable remote debug in apache tomcat. Here I am using Mac OS X. You can use same steps in Linux environment.
1. Open Terminal window and Set CATALINA_OPTS environment variable. Execute following command.
export CATALINA_OPTS="-agentlib:jdwp=transport=dt_socket,address=1043,server=y,suspend=n"


1. Open Terminal window and Set CATALINA_OPTS environment variable. Execute following command.
export CATALINA_OPTS="-agentlib:jdwp=transport=dt_socket,address=1043,server=y,suspend=n"
2. Goto <Tomcat_home>/bin and execute below command.
./catalina.sh run
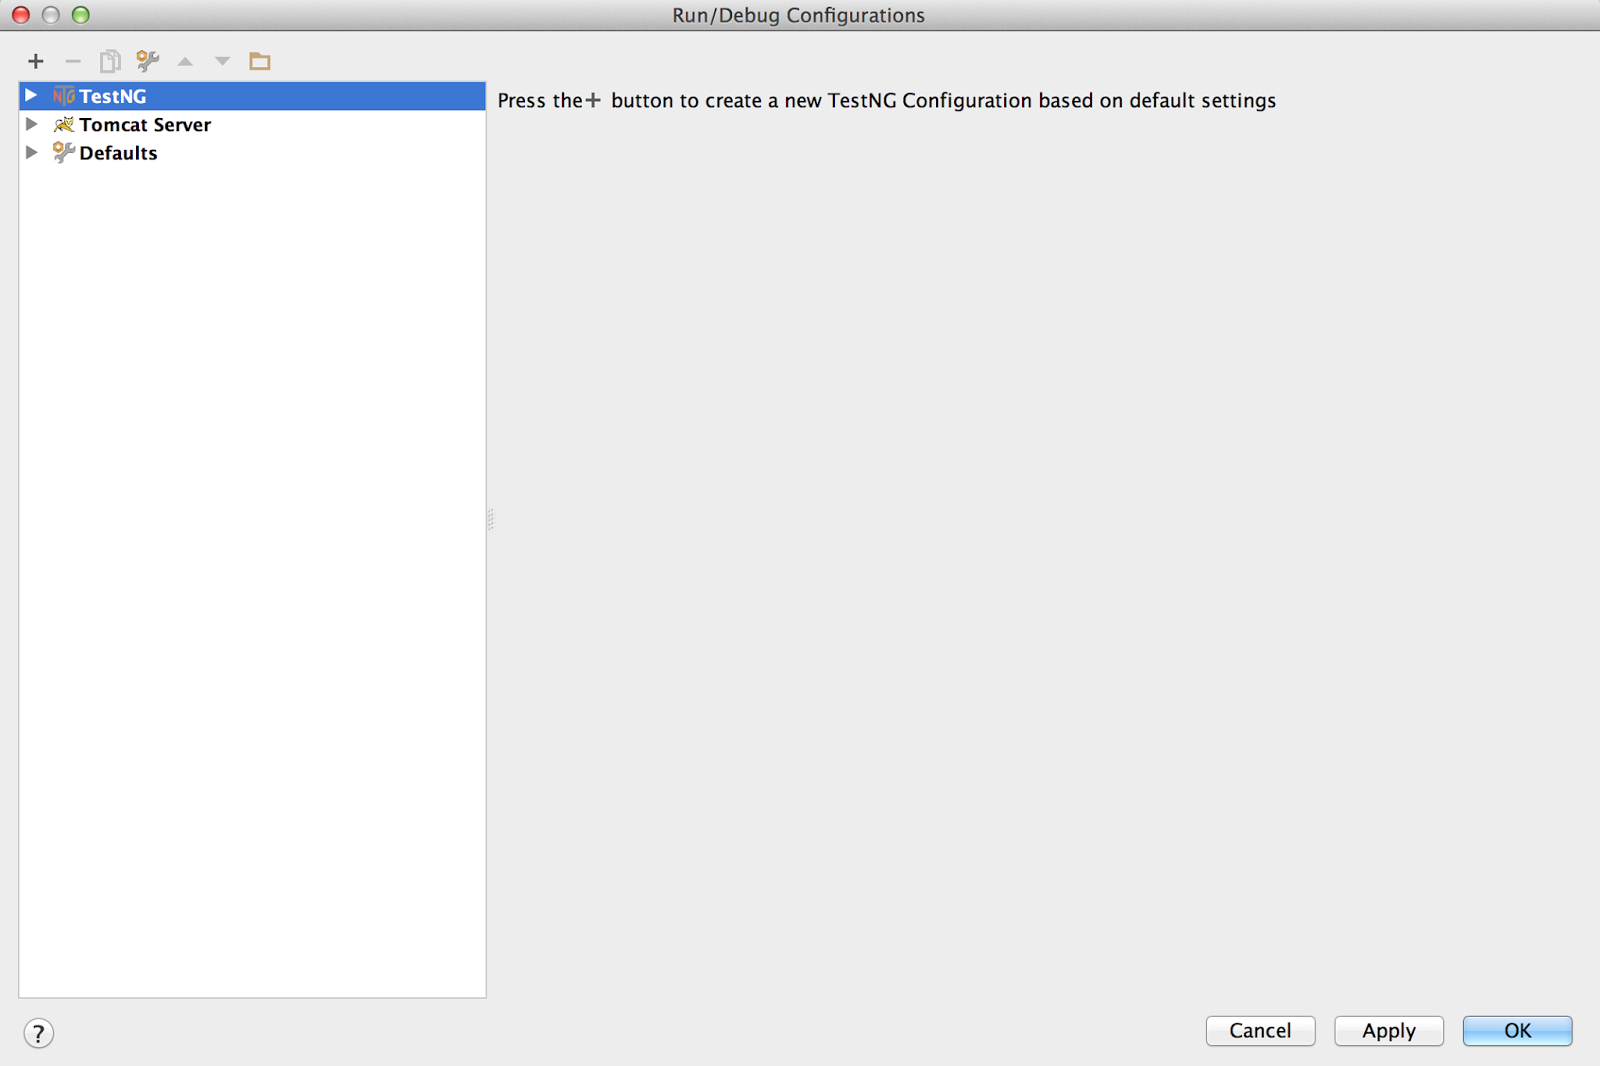
3. Open required project from IntelliJ IDEA. (You can use other IDE such as Eclipse)
4. Go to Run->Edit Configurations
4. Add Remote debug by Clicking + and Remote
5. Change debug port to 1043 and click Apply and Debug
Thats all, you can add required breakpoint and debug the application.
Cheers. Hope this will help you all.
Troubleshoot WSO2 products
Troubleshooting is something key thing software products should have both in production and development stage. All WSO2 product has debug log facility to help developers to understand the exact problem.
Steps to enable debug log
1. Edit log4j.properties file which located in <IS_HOME>/repository/conf directory.
3. Sometime you want to enable debug log in specific component, then you can the entry as follows.
log4j.logger.org.wso2.carbon.user.core=DEBUG
This will enable all logs related to user core component.
4. Restart the product.
Hope this will help you.
Steps to enable debug log
1. Edit log4j.properties file which located in <IS_HOME>/repository/conf directory.
2. Add following entry to enable debug logs for all component in the product.
log4j.logger.org.wso2=DEBUG
log4j.logger.org.wso2.carbon.user.core=DEBUG
This will enable all logs related to user core component.
4. Restart the product.
Hope this will help you.
Wednesday, November 26, 2014
Resolve "ORA-01882: timezone region not found" when start WSO2 Product with Oracle Database
When datasource point to Oracle DB following error occurred when start any WSO2 product.
Solution
Add following entry to <WSO2_PRODUCT>/bin/wso2server.sh
-Duser.timezone="+05:30" \
Please see below a sample wso2server.sh with after modification with highlight.

Caused by: java.sql.SQLException: ORA-00604: error occurred at recursive SQL level 1
ORA-01882: timezone region not found
at oracle.jdbc.driver.T4CTTIoer.processError(T4CTTIoer.java:440)
at oracle.jdbc.driver.T4CTTIoer.processError(T4CTTIoer.java:389)
at oracle.jdbc.driver.T4CTTIoer.processError(T4CTTIoer.java:382)
at oracle.jdbc.driver.T4CTTIfun.processError(T4CTTIfun.java:573)
at oracle.jdbc.driver.T4CTTIoauthenticate.processError(T4CTTIoauthenticate.java:431)
at oracle.jdbc.driver.T4CTTIfun.receive(T4CTTIfun.java:445)
at oracle.jdbc.driver.T4CTTIfun.doRPC(T4CTTIfun.java:191)
at oracle.jdbc.driver.T4CTTIoauthenticate.doOAUTH(T4CTTIoauthenticate.java:366)
at oracle.jdbc.driver.T4CTTIoauthenticate.doOAUTH(T4CTTIoauthenticate.java:752)
at oracle.jdbc.driver.T4CConnection.logon(T4CConnection.java:366)
at oracle.jdbc.driver.PhysicalConnection.<init>(PhysicalConnection.java:536)
at oracle.jdbc.driver.T4CConnection.<init>(T4CConnection.java:228)
at oracle.jdbc.driver.T4CDriverExtension.getConnection(T4CDriverExtension.java:32)
at oracle.jdbc.driver.OracleDriver.connect(OracleDriver.java:521)
at org.apache.tomcat.jdbc.pool.PooledConnection.connectUsingDriver(PooledConnection.java:278)
at org.apache.tomcat.jdbc.pool.PooledConnection.connect(PooledConnection.java:182)
at org.apache.tomcat.jdbc.pool.ConnectionPool.createConnection(ConnectionPool.java:701)
at org.apache.tomcat.jdbc.pool.ConnectionPool.borrowConnection(ConnectionPool.java:635)
at org.apache.tomcat.jdbc.pool.ConnectionPool.getConnection(ConnectionPool.java:188)
at org.apache.tomcat.jdbc.pool.DataSourceProxy.getConnection(DataSourceProxy.java:127)
at org.wso2.carbon.user.core.claim.dao.ClaimDAO.getDialectCount(ClaimDAO.java:158)
... 22 more
Solution
Add following entry to <WSO2_PRODUCT>/bin/wso2server.sh
-Duser.timezone="+05:30" \
Please see below a sample wso2server.sh with after modification with highlight.
Subscribe to:
Posts (Atom)